If you set a Bandwidth limit, you can cut off the extra cost you pay for overusing the internet. There are many Windows 10 Bandwidth Limiter apps available on the internet, but guess what? You don’t need a third-party app to limit Bandwidth. In addition, most of the modems and routers now offer a bandwidth manager, which allows controlling all connected devices’ speed and data usage.
How To Limit Internet Bandwidth Of WiFi Users in 2022
So, here in this article, we will share a detailed tutorial on how to set up Bandwidth control on TP-Link and D-Link Router.
1) TP-Link
To set up bandwidth control on the TP-Link Router, you need to follow some simple steps below. However, make sure to follow the steps accordingly to avoid any errors.
First of all, open your web browser, and on the URL bar, type in the default access like http://tplinkwifi.net.
In the next step, you will be asked to enter the ID and Password. If you haven’t changed the password, the default one is usually ‘admin’ in lower case.
Now, click on the ‘Bandwidth Control Settings’ from the left-hand side menu.
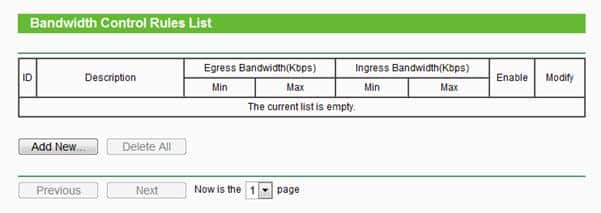
Now, head to the Bandwidth Control > Rules List and click on Add New.
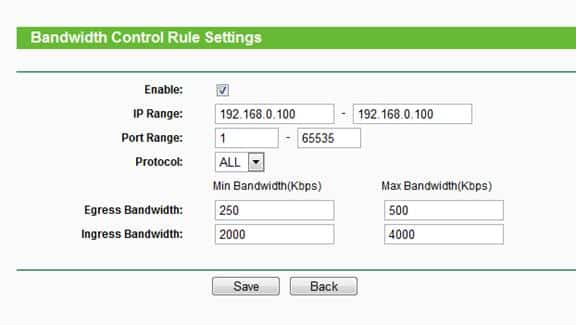
Next, you will be asked to enter the IP Address. Enter the device’s IP Address to which you want to apply the bandwidth rule. Under the Egress Bandwidth enter the Max and Min upload speed limit. Under the Ingress Bandwidth enter the min and max download speed. The default number is 0.
Finally, click on Save. That’s it; you are done! Now, if you want to remove the Bandwidth limit, head to the same page and delete the rule.
2) D-Link
Like TP-Link, D-Link routers also allow users to set up Bandwidth control. So, for that, follow some of the simple steps given below.
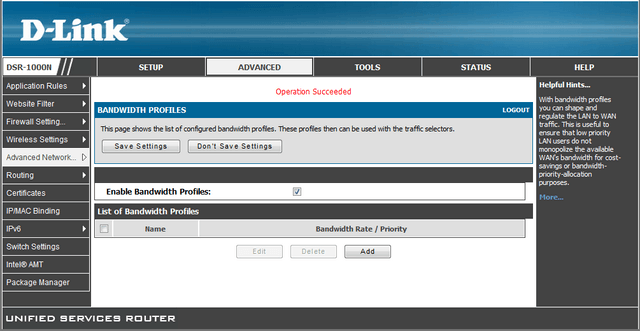
First, log in to the D-link router login page and click on Advanced from the top menu bar. Now, hover over the Advanced Network, then under the Traffic Management, click on ‘Bandwidth Profiles’
Now, you need to enable the Enable Bandwidth Profiles tickbox and click Save. Next, click on Add to create a new bandwidth limit.
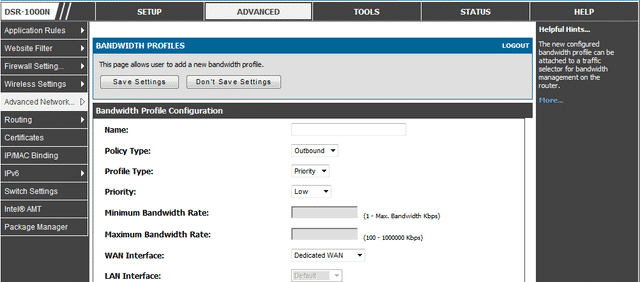
You need to name the profile and change the ‘Profile Type’ to Rate from the drop-down menu. Next, enter the Minimum and Maximum Bandwidth Rate and click on ‘Save Settings’
Now, from the left-hand side menu, click on ‘Traffic Control’ and tick on the ‘Enable Traffic Control’. Now scroll down, and under the ‘Traffic Control Rules’ enter the IP Address and select the rule you have created above. Finally, save the settings. That’s it; you are done! This is how you can limit Bandwidth on a Network Manually on both TP-Link and D-Link Router. Discuss them with us in the comment box below if you have any other doubts.