If you are a regular Google Chrome user, you might have come across the Err_Cache_Miss error at some point. Err_Cache_Miss is a common Chrome error that usually appears while accessing sites.
What is Err_Cache_Miss in Chrome?
The Err_Cache_Miss generally appears when loading a web page in the Google Chrome web browser. The error code itself says that the error is related to the Cache file. Usually, the Err_Cache_Miss results from a mismatch between the website and the version of the cache stored on your device. The error could also be a result of a network issue, a problem with your web browser, or the website you are visiting itself. Since it’s pretty hard to assume the actual reason for the Err_Cache_Miss, we need to follow some basic methods to get it fixed.
7 Methods to Fix Err_Cache_Miss in Chrome browser
Now that you are fully aware of Err_Cache_Miss, you might like to fix it. Below, we have listed a few best methods to fix Err_Cache_Miss in the Google Chrome web browser. Let’s check out.
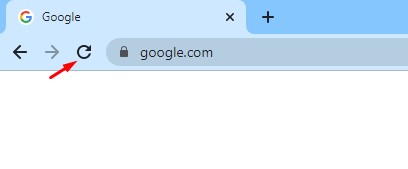
1) Hard Refresh the Web Page
The first thing you should do to fix the Err_Cache_Miss error is to hard refresh (Shift+Reload button) the webpage you are trying to load.
To reload the webpage, you need to click on the Restart button on your Chrome browser. Alternatively, you can also press the F5 key on your keyboard to refresh the webpage.
2) Restart the Web Browser
If you are still getting the Err_Cache_Miss error message after refreshing the web page, you need to relaunch the web browser. It’s simple to relaunch Google Chrome on Windows 11; close the browser and open it again. After the restart, open the website again to check whether the Err_Cache_Miss had been resolved or not.
3) Update Your Chrome Browser
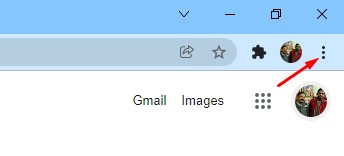
Few users have reported updating their Chrome browser to fix the Err_Cache_Miss error message. So, you can try updating your Chrome browser to fix the Cache issue.
First of all, open the Google Chrome web browser and click on the three dots as shown below.
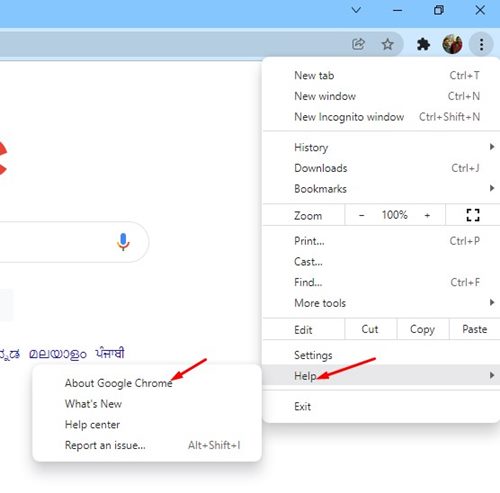
On the menu, click on the Help > About Google Chrome option.
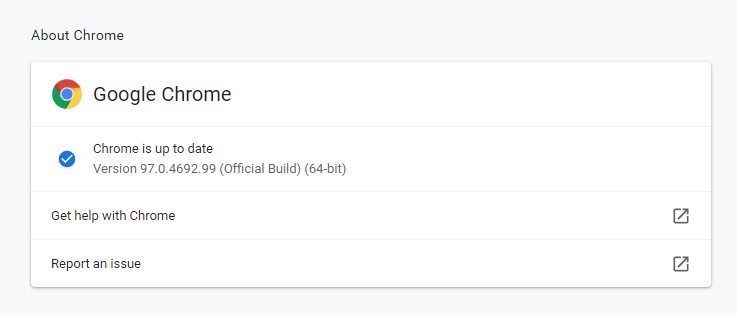
Now, Google Chrome will check for the available updates. After the update, click on the Relaunch button to restart the web browser.
That’s it! You are done. This is how you can update your Chrome browser to fix the Err_Cache_Miss error.
4) Disable the Chrome Extensions
Although Chrome extensions were meant to expand the functionality of Chrome, several extensions can create problems with the Cache files. Some extensions can even prevent a website from loading fully. So, if you have just added a new Extension to Chrome, it’s best to disable and check the website. Here’s how to disable Chrome extensions.
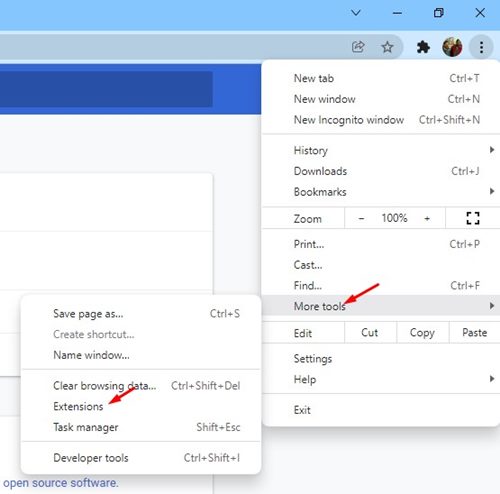
First of all, open Google Chrome and click on the three dots as shown below.
From the list of options, select More Tools > Extensions.
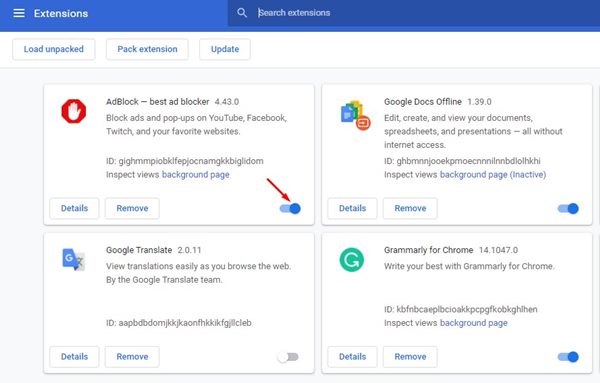
This will open the Extensions page. You need to click on the slider below the extension description to enable/disable the extension.
After disabling the extensions, restart your web browser and visit the website where you are getting the Err_Cache_Miss error message.
5) Disable Chrome Caching
If you are still getting the Err_Cache_Miss error message even after following the above methods, you need to disable the Chrome caching. Here’s how to disable the Chrome caching to fix the Err_Cache_Miss error.
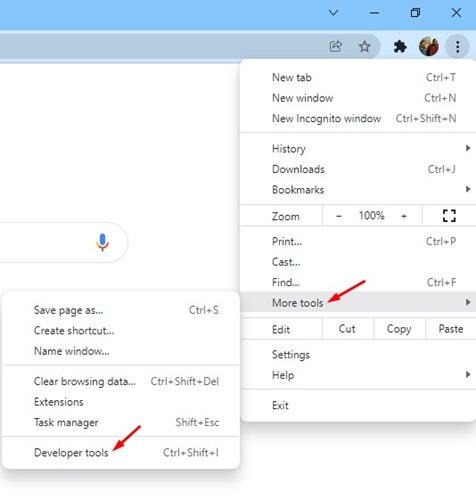
First of all, open the Google Chrome browser and click on the three dots as shown below.
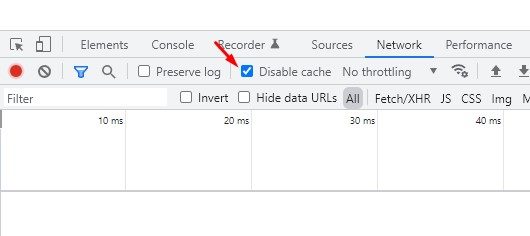
On the drop-down menu, select More Tools > Developer Tools.
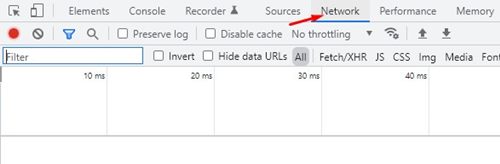
Now, you need to switch to the Network tab, as shown below.
On the Network, you need to check the ‘Disable Cache’ option.
That’s it! You are done. Now reload the webpage, and you won’t get the Err_Cache_Miss error message anymore.
6) Reset Network Settings
The Err_Cache_Miss might also be a result of a network problem. So, in this method, we will reset the Network settings of Windows 11. Network reset will remove any conflict that stops your internet from working properly. Here’s what you need to do.
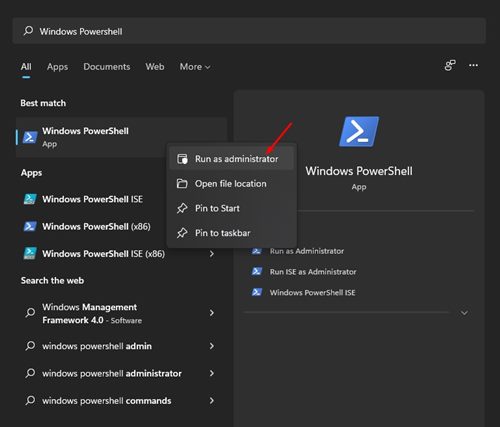
First of all, open Windows 10/11 search and type in Windows PowerShell. Right-click on the Windows Powershell and select ‘Run as administrator’
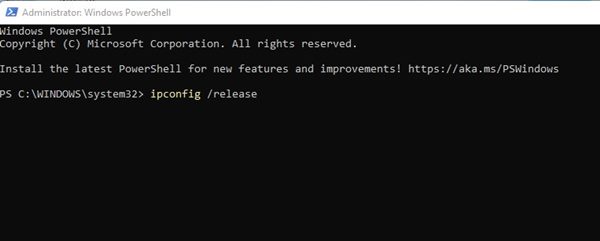
On the PowerShell Window, you need to enter the following commands. Make sure to execute the commands to reset your network connection.
ipconfig /release ipconfig /flushdns ipconfig /renew netsh winsock reset
Alternatively, you can follow our guide – Reset Network Settings in Windows 11 to reset the Network without CMD or Powershell.
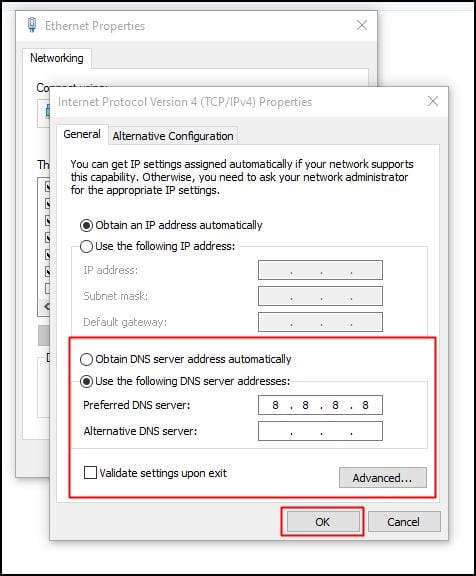
7) Change the DNS
Sometimes, changing the DNS settings also fixes various web browser related problems. Although it’s not a sure-shot fix, you can try changing the DNS server of your PC to fix Err_Cache_Miss. Changing the DNS server is pretty easy on Windows 10 and Windows 11. You need to follow our guide Change DNS server on Windows to know how to change the DNS server in easy steps. Err_Cache_Miss is a common Chrome problem, but it can be easily fixed. You need to implement all methods to fix the problem on your Chrome browser. I hope this article helped you! Please share it with your friends also. If you have any doubts related to this, let us know in the comment box below.